

jasin
Forum Replies Created
-

Hello
Here it is.
It was tested as PlatformIO project with this config (.ini)
; PlatformIO Project Configuration File
;
;   Build options: build flags, source filter
;   Upload options: custom upload port, speed and extra flags
;   Library options: dependencies, extra library storages
;   Advanced options: extra scripting
;
; Please visit documentation for the other options and examples
; https://docs.platformio.org/page/projectconf.html

[env:controllino_maxi]
platform = atmelavr
board = controllino_maxi
framework = arduino
lib_deps = controllino, ethernet, SPI, MQTT
Code:
#include <SPI.h>
#include <Controllino.h> /* Usage of CONTROLLINO library allows you to use CONTROLLINO_xx aliases in your sketch. */
#include <Ethernet.h>
#include <MQTT.h> /* by Joël Gähwiler. Have to be installed via Library Manager. See https://github.com/256dpi/arduino-mqtt */
/*
CONTROLLINO - Demonstration of MQTT protocol usage, Version 01
Based on example code by Joël Gähwiler. See https://github.com/256dpi/arduino-mqtt .
You can check on your device after a successful
connection here: https://shiftr.io/try .
Compatible with CONTROLLINO MAXI, MAXI Automation and MEGA.
IMPORTANT INFORMATION!
Please, select proper target board in Tools->Board->Controllino MAXI/MEGA before Upload to your CONTROLLINO.
(Refer to https://github.com/CONTROLLINO-PLC/CONTROLLINO_Library if you do not see the CONTROLLINOs in the Arduino IDE menu Tools->Board.)
Created 29 Jan 2019
by Jasin
https://controllino.biz/
Check https://github.com/CONTROLLINO-PLC/CONTROLLINO_Library for the latest CONTROLLINO related software stuff.
Visit our forum here: https://forum.controllino.biz/
*/
byte mac[] = {0xDE, 0xAD, 0xBE, 0xEF, 0xFE, 0xED};
byte ip[] = {192, 168, 16, 177}; // <- change to match your network
EthernetClient net;
MQTTClient client;
unsigned long lastMillis = 0;
void connect() {
Serial.print("connecting...");
while (!client.connect("Controllino", "try", "try")) {
Serial.print(".");
delay(1000);
}
Serial.println("nconnected!");
client.subscribe("/controllino.biz");
// client.unsubscribe("/hello");
}
void messageReceived(String &topic, String &payload) {
Serial.println("incoming: " + topic + " - " + payload);
}
void setup() {
Serial.begin(9600);
Ethernet.begin(mac, ip);
// Note: Local domain names (e.g. "Computer.local" on OSX) are not supported by Arduino.
// You need to set the IP address directly.
client.begin("broker.shiftr.io", net);
client.onMessage(messageReceived);
connect();
}
void loop() {
client.loop();
if (!client.connected()) {
connect();
}
// publish a message roughly every second.
if (millis() - lastMillis > 1000) {
lastMillis = millis();
client.publish("/controllino.biz", "Hello Controllino");
}
}
/* 2019-01-29: The sketch was successfully tested with Arduino 1.8.5, Controllino Library 3.0.4 and CONTROLLINO MAXI. */
-
This reply was modified 4 years, 9 months ago by
 ivan-controllino.
-
This reply was modified 4 years, 3 months ago by ivan-controllino.
-
This reply was modified 4 years, 3 months ago by ivan-controllino.
-
This reply was modified 4 years, 3 months ago by ivan-controllino.
-
This reply was modified 4 years, 9 months ago by
-
-
Hello, Ad connecting and reconnecting to Serial port of Controllino and Arduino in general.
In C# when You use
SerialPort ClassSerialPort.DtrEnable PropertyWhen it is disabled connecting and reconnecting to Controllino (tested on Mini, Maxi and Mega) do NOT cause Controllino to reset.
Here is example of my Class and Constructor I used for tests:
Code:
using System.IO.Ports;///
/// Defines the
///public class COMPort : SerialPort
{///
/// Initializes a new instance of the class.
////// The aPortname
/// The aBaudRate
/// The aDataBits
public COMPort(string aPortname, int aBaudRate, int aDataBits, bool aDtrEnable)
{
// open ComPort
this.PortName = aPortname;
this.BaudRate = aBaudRate;
this.DataBits = aDataBits;
this.Parity = System.IO.Ports.Parity.None;
this.StopBits = System.IO.Ports.StopBits.One;
this.Handshake = System.IO.Ports.Handshake.None;
this.RtsEnable = true;
this.DtrEnable = aDtrEnable;
}
}
And when I open COM port with aDtrEnable=true it causes reset, but when I open COM port with aDtrEnable=false the Controllino (even Arduino UNO and Arduino MEGA) do NOT reset.
-
It is also possible to use several Controllino devices in a Master-Slave Scenario.
Example scenario see:
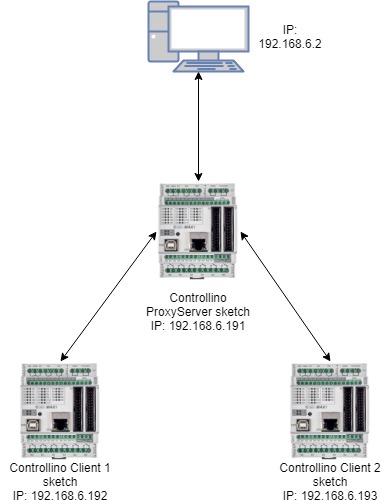
[img]https://i.postimg.cc/3rkZ3XYJ/Controllino-net.jpg%5B/img%5DWhere two “slave” Controllinos are connected to one “Master” Controllino and these 3 devices acts like “one”.
When “Master” acts like “proxy” for TCP messages from “slaves”.
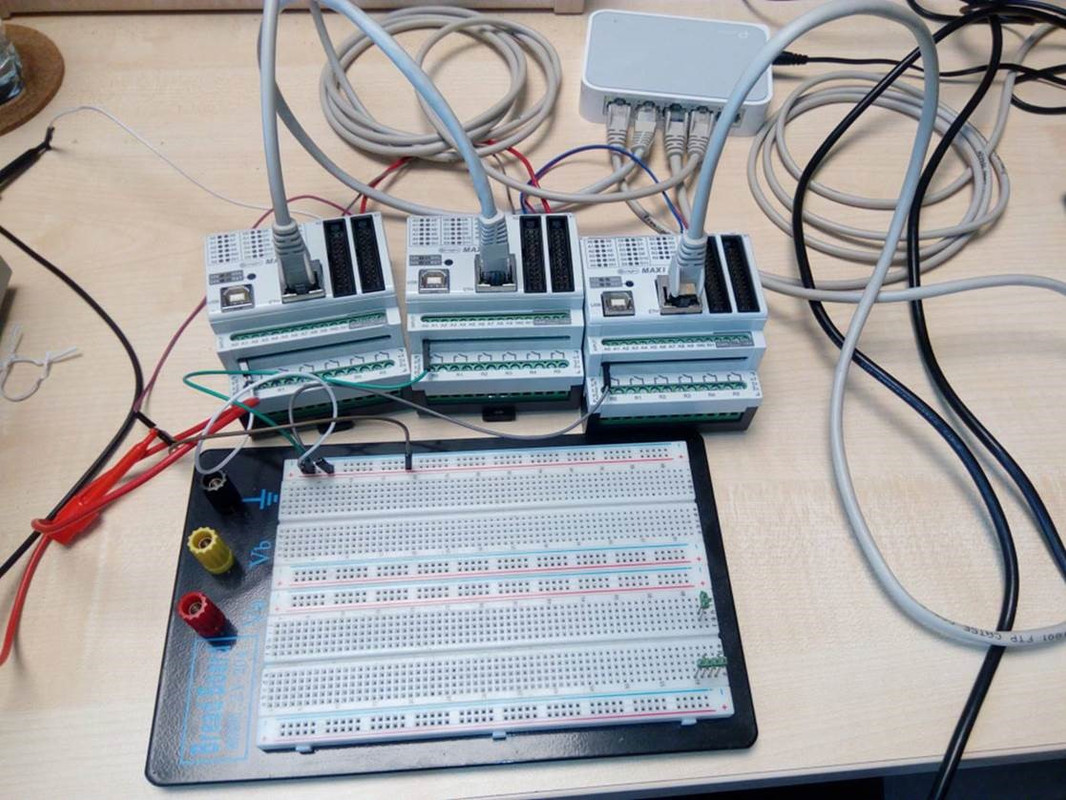
Real setup with logical “1” connected to A0 of each Controllino see:

[img]https://i.postimg.cc/8cxNFhG3/Controllino-setup.jpg%5B/img%5DFor listening on PC Hercules tool has been used see:
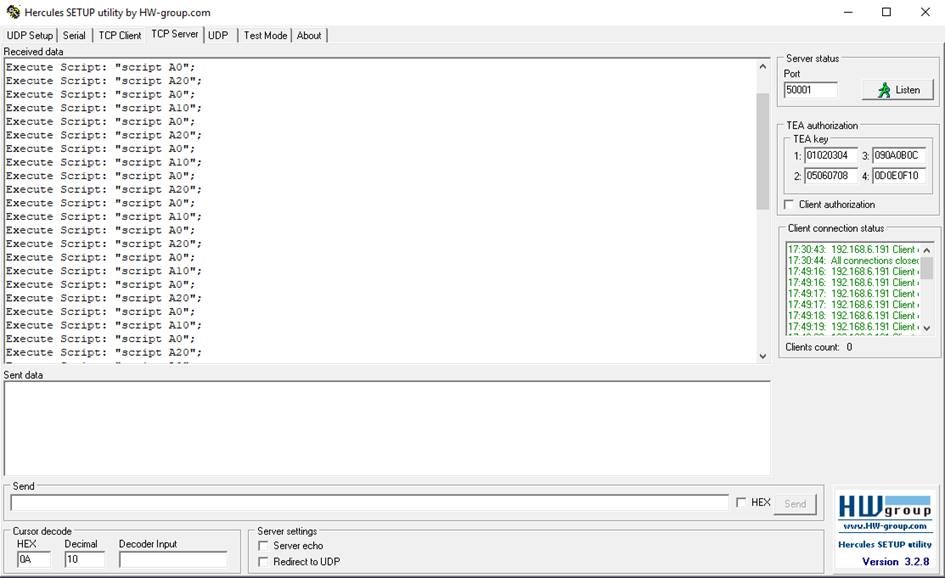
[img]https://i.postimg.cc/13tbxgZV/Controllino-Hercules-listen.jpg%5B/img%5DWhich receives messages from all 3 devices.
Master Controllino sketch:
Code:
#include
#include
#include/*
CONTROLLINO – Demonstration of TCP protocol usage, Version 01Compatible with CONTROLLINO MAXI, MAXI Automation and MEGA.
IMPORTANT INFORMATION!
Please, select proper target board in Tools->Board->Controllino MAXI/MEGA before Upload to your CONTROLLINO.(Refer to https://github.com/CONTROLLINO-PLC/CONTROLLINO_Library if you do not see the CONTROLLINOs in the Arduino IDE menu Tools->Board.)
Created 14 Jun 2019
by Jasin
https://controllino.biz/Check https://github.com/CONTROLLINO-PLC/CONTROLLINO_Library for the latest CONTROLLINO related software stuff.
Visit our forum here: https://forum.controllino.biz/
*/// Set MAC adress
byte mac[] = {0xE8, 0x2A, 0xEA, 0x4B, 0x1F, 0xC3};
// Set local IP
IPAddress localip(192, 168, 6, 191);
// Set remote IP of server
IPAddress serverip(192, 168, 6, 2);EthernetClient client;
EthernetServer server(50001);String message = “”;
void setup()
{
pinMode(CONTROLLINO_A0, INPUT);//initialize Ethernet
Ethernet.begin(mac, localip);// Check for Ethernet hardware present
if (Ethernet.hardwareStatus() == EthernetNoHardware)
{
while (true)
{
delay(1); // do nothing, no point running without Ethernet hardware
}
}server.begin();
}void loop()
{message = “”;
// check incoming connection
EthernetClient proxyserver = server.available();
if (proxyserver)
{
//read incomming message
while (proxyserver.connected())
{
if (proxyserver.available())
{
char c = proxyserver.read();
message += c;
}
}//Send received message to server (serverip)
client.connect(serverip, 50001);
delay(10);
client.print(message);
delay(10);
//close both TCP connection
client.stop();
proxyserver.stop();
}
delay(400);
//handle local input
if (digitalRead(CONTROLLINO_A0))
{
//connect to server
client.connect(serverip, 50001);
delay(10);
//send a message to server (serverip)
client.println(“Execute Script: “script A0″;”);
delay(10);
//close TCP connection
client.stop();
delay(400);
}
}Client 1 Controllino sketch:
Code:
#include
#include
#include/*
CONTROLLINO – Demonstration of TCP protocol usage, Version 01Compatible with CONTROLLINO MAXI, MAXI Automation and MEGA.
IMPORTANT INFORMATION!
Please, select proper target board in Tools->Board->Controllino MAXI/MEGA before Upload to your CONTROLLINO.(Refer to https://github.com/CONTROLLINO-PLC/CONTROLLINO_Library if you do not see the CONTROLLINOs in the Arduino IDE menu Tools->Board.)
Created 14 Jun 2019
by Jasin
https://controllino.biz/Check https://github.com/CONTROLLINO-PLC/CONTROLLINO_Library for the latest CONTROLLINO related software stuff.
Visit our forum here: https://forum.controllino.biz/
*/// Set MAC adress
byte mac[] = { 0xE8, 0x2A, 0xEA, 0x4B, 0x1F, 0xC3 };
// Set local IP
IPAddress localip(192, 168, 6, 192);
// Set remote IP of server
IPAddress server(192, 168, 6, 191);EthernetClient client;
void setup(){
pinMode(CONTROLLINO_A0, INPUT);//initialize Ethernet
Ethernet.begin(mac, localip);// Check for Ethernet hardware present
if (Ethernet.hardwareStatus() == EthernetNoHardware) {
while (true) {
delay(1); // do nothing, no point running without Ethernet hardware
}
}}
void loop(){
//handle local input
if(digitalRead(CONTROLLINO_A0))
{
//connect to server
client.connect(server, 50001);
delay(10);
//send a message to server
client.println(“Execute Script: “script A10″;”);
delay(10);
//close TCP connection
client.stop();
delay(1000);
}
}Client 2 Controllino sketch:
Code:
#include
#include
#include/*
CONTROLLINO – Demonstration of TCP protocol usage, Version 01Compatible with CONTROLLINO MAXI, MAXI Automation and MEGA.
IMPORTANT INFORMATION!
Please, select proper target board in Tools->Board->Controllino MAXI/MEGA before Upload to your CONTROLLINO.(Refer to https://github.com/CONTROLLINO-PLC/CONTROLLINO_Library if you do not see the CONTROLLINOs in the Arduino IDE menu Tools->Board.)
Created 14 Jun 2019
by Jasin
https://controllino.biz/Check https://github.com/CONTROLLINO-PLC/CONTROLLINO_Library for the latest CONTROLLINO related software stuff.
Visit our forum here: https://forum.controllino.biz/
*/// Set MAC adress
byte mac[] = { 0xE8, 0x2A, 0xEA, 0x4B, 0x1F, 0xC4 };
// Set local IP
IPAddress localip(192, 168, 6, 193);
// Set remote IP of server
IPAddress server(192, 168, 6, 191);EthernetClient client;
void setup(){
pinMode(CONTROLLINO_A0, INPUT);//initialize Ethernet
Ethernet.begin(mac, localip);// Check for Ethernet hardware present
if (Ethernet.hardwareStatus() == EthernetNoHardware) {
while (true) {
delay(1); // do nothing, no point running without Ethernet hardware
}
}}
void loop(){
//handle local input
if(digitalRead(CONTROLLINO_A0))
{
//connect to server
client.connect(server, 50001);
delay(10);
//send a message to server
client.println(“Execute Script: “script A20″;”);
delay(10);
//close TCP connection
client.stop();
delay(1000);
}
}